Sunday, June 30, 2013

Medieval Times Dallas and Rangers vs Reds

 This Saturday (6/29) I took a trip to Dallas with one of my roommates and two friends from work.  The plan was to first go to Medieval Times, which is sort of a show where they do jousting and medieval stuff.  I don't quite know how to succinctly explain it.  Hopefully this post will make it more clear.

It was a bit of a drive, but we arrived in perfect time and we got there about 15 minutes before the show, which wasn't bad at all.  We walked up to the "castle" and prepared ourselves for the excitement to come!

 Luckily we were invited guests or we might never have been able to cross the dangerous moat which was filled with several vicious koi fish.

Once we got in they took two pictures that they would later try to sell to us for $20.  The first picture was just us with the falconer.  The second picture they dressed us all up in costumes and gave us weapons and shields.  For some reason I got chosen as the king, so I got a crown.  It was kind of a strange process.  They called us all lords.  It was m'lord this and m'lord that.  I guess that it was just all to stay in character.  We decided to buy a bottle of wine and the guy who took the credit card tried acting like the card reader was magic.  It was.... interesting.

Anyway, then we got in and checked out the lobby area.  The King was lounging on his throne, as shown below.  There were also places to buy souvenirs and drinks, but the drinks were kind of insane.  To get a beer or mixed beverage you had to buy it to keep the cup, which meant that the cheapest drink was like $16.  I suppose then you got to keep the cup.... but it seemed like a really big waste of money. The bottle of wine for $20 actually seemed like a great deal in comparison.  The wine wasn't amazing, but it was almost as much as one glass of beer.

The highlight might have been the horses stable where we discovered that there was a white horse that was called... blacky! I just thought that was pretty funny.

Everyone got little crowns, (which looked like Burger King Crowns), that signified both where they were sitting and the knight that they would root for.  We got assigned the yellow crowns, so we sat down and settled in.  Here the other guys in our seats with the crowns.

 I took a panoramajama of the arena.  We were at the far end, which meant that we were the farthest away from the king and princess.

 If you would like to view the panorama in an interactive viewer you can use the link below:
Arena Panorama

Our first course was tomato bisque soup, which was served in a little bowl with a handle.  This is due to the fact that we are not allowed to use utensils!  We also had a choice of drinks, which was either coke or unsweetened ice tea.  I didn't want either..... I didn't ask about water, but I just stuck with the wine.

Soon our knight came out, as shown below.  He was a young knight, but he seemed pretty competent, but he also seemed a bit temperamental.  He always seemed disappointed at the other knights.  After some wine it was pretty easy to root for him.
 Once all the knights came out, there were six in total, the king and all the servers came out and marched around and we got a little speech welcoming us and telling us who people were, like the captain of the guards and the Master of the Horses.

Everyone left the arena and the king went up to his throne and gave a bit more of a speech.  Then we got a little show with horses doing some tricks.  It was ok, I wasn't sure if the moves were all that amazing, since I don't know a lot about horses.

Then the falconer came out!  This might have been the coolest part, the falconer sent the falcon flying out over the crowd, and it was really close to us.  I tried to gt a picture of the falcon flying, but it was too fast.  So here is a picture of the guy standing with his falcon.

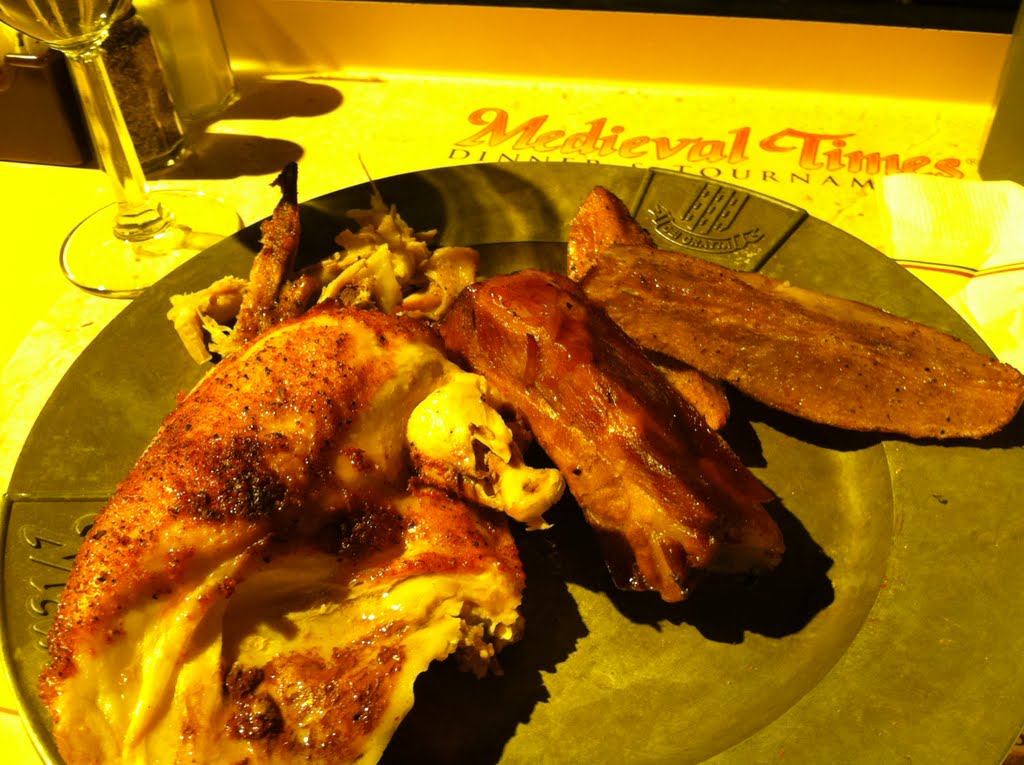
Then we got course number two, which was a very large piece of chicken!
 A little while later they brought out the other courses, which was two potato wedges and one rib.  The food was all pretty good.  It was a lot of chicken compared to the other stuff, but it was still tasty I suppose.  Again, we didn't have any silverware, so we had to use our hands to eat it.
During this we got the main story of the show which was this herald who showed up from the King in the North and demanded the hand of the princess of the North would attack.  The King denied him, and the herald left for a while.

Then we got several competitions between the knights. The first was a ring game where the knights rode their horses and tried putting their lances through the ring to catch it.  All the knights won, so they all got flowers.  They rode to their specific areas and tossed out the flowers to their fans.  Our knight almost tossed me a flower.... which was a little strange.... but he didn't Next was a weird lance target game.  They rode their horses down the arena and then slammed their lances into a target and got points if it stuck.  They all got it to stick, so all the knights won and all got flowers to pass to their areas.
The next competition was a flag came where they passed flags between each other while riding their horses. Again everyone won.  The final competition was another kind of ring catching game.  This time only the yellow knight and the red and yellow knight won. So I guess that we were in the lead!

Then we got our dessert.... which was basically a McDonald's apple pie, but it was piping hot, so I suppose that makes it better.  It wasn't bad, but it was a little cheap.


Then we got to the main event.  Jousting! .... Kind of real jousting!  Here our knight is all geared up. His squire is exchanging flags to signify... something.

The joust was interesting, though not incredibly realistic.  Instead of describing it, I took a video

I didn't realize there were so many videos of this stuff on youtube... but I swear that I took this!

Unfortunately, our knight did not win.  He won his joust/fight, then the Red and Yellow knight came out and challenged him to a fight... then he lost that fight, which was a little sad.  The Red and Yellow knight went on to win the entire thing.

After that he fought the herald from the King in the North to the "death" to determine if the North would attack.  Luckily, the Red and Yellow knight won and the kingdom was saved.  I almost wished the bad guy won, since at least that would have been exciting.... then we might have seen a war!

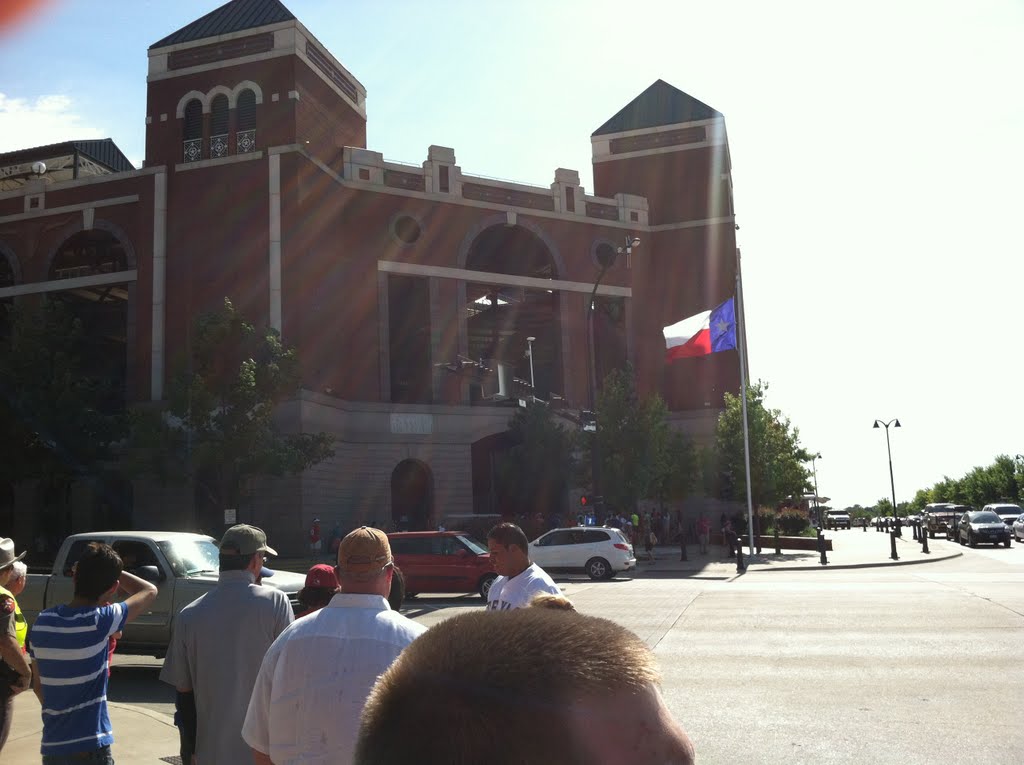
 After it was over we headed out to the Rangers game.  We were about an hour early, which wasn't too bad.  Here is the entrance to the stadium.

Here is Dave in his Reds jersey.  He was in enemy territory! I was totally worried that we were going to get attacked! (Not really)
 Anyway, we were early, so I decided to walk to see the Dallas Cowboys Stadium (or at least get close to it) Everyone decided to join me, which I kind of felt bad about.  The stadium is below, the picture doesn't really do it justice... it is really huge.

Here everyone is walking back to the stadium.  We got decent weather, it was only 95 degrees.... the day before it had been 106... so it was a large improvement.

We found our seats, which were in the left field bleachers,  and I again took a panorama.

 Here is the link to the interactive viewer.
Seats Panorama

I also took a picture with everyone. 

The picture below is of the best moment of the game, which was the sun going down behind the stadium facade.  This happened in the fifth inning, so basically half the game was really really hot. We were basically directly in the sun.  I had to take a trip inside to get some ice cream which helped a lot.  Luckily they let me bring in the water bottles that I brought.  This was very good.... since they sold small water bottles for 4.50 or about a 300% markup.  It almost felt criminal based on how hot it was.

The game was fun.  I would say the rangers have a great ballpark.  They claim to be the loudest ballpark in baseball.  But I imagine a lot of parks do that.  They had some nice animations for things and some interesting games.  The best one was the whataburger contest where the contestants had to toss large foam fries into a fry holder.

In about the 8th inning Kyle and Dave got a boomstick, which was a 2 foot long hot dog.... it was huge.  They kept trying to get us to eat it... but I didn't have much appetite after sitting in the sun for most of the game.
The reds won in overtime, which was good for Dave, but not most of the fans.  Greg and I were both cheering for the rangers... just because we needed someone to cheer for.  I certainly wasn't distraught that they lost.

After that we headed home.  It was a good day.  Pretty busy, but pretty fun.

Sunday, June 23, 2013

Game of Thrones Kindle Dictionary

One day as I was talking to some friends who were reading the Game of Thrones series on their kindles, I realized that it would be awesome to have a dictionary that was tied into the Kindle and had all the characters and locations built in so that you could look it up.

With the X-Ray stuff that comes with the book there are some details about the characters, but not too much, and there is no information about the locations or maps.  In particular, the maps that come with the books look awful on the kindle.

So I decided to try and do something about it.

To do this I first had to determine exactly how to create a dictionary for the kindle.  Luckily I found an extremely useful site that detailed exactly how to make a dictionary and provided the software necessary to actually create it.  The link with all of the necessary information is Kindle Dictionary.

Second I had to determine where to get the information from.  To do this I primarily used the Game of Thrones Wikipedia page, which can be found here.  I also supplemented it with my knowledge of the series.

I started by taking the list of characters and then going through them and adding descriptions for them.  Since I wanted this to be useful for all readers, not just those that have read all the books I went through a lot of pains to remove all spoilers.  In particular I had to remove past tense verbs for characters who were dead and plot points from later books.

I then talked to my friends who were reading the series and added a few more categories that they wanted such as ship names and house information.  Finally, I added all the locations and maps for most of them.

All in all it ended up being a pretty extensive dictionary and seems to be fairly useful.  It certainly isn't perfect, but I think it is a good first start.

I will just go over a little bit about how it works, which is basically just how a Kindle Dictionary works.

 If there is a word that you want to know the definition of you simple highlight it, either with your finger or .... other Kindle Device. I have a touch, so I don't know how the other Kindles work.  Anyway, you highlight the word and it brings up the beginning of the definition.  In the picture below I highlighted Robb and so it brings up the definition for Robb Stark.  If you wanted to read the entire definition then you click the full definition button.  There are some names with multiple characters, such as Jon.  For those I had to make disambiguation pages that have the list of all Jon's and then you can pick the one that you want to read about.


I tried to include locations for all of the maps.  The example below shows that.  In this case it is just a map of the North that has the information for Widow's Watch on top of it.

The Kindle allows you to increase the size of the images.  To do that just click and hold on the image and then the following screen will pop up.  You can click the magnifying class to get the image to go full screen.

Which isn't really large... but larger at least.

For places where the map did not fit on the page I added a sentence saying that the map was on the next page.

And that was pretty much that.  That was a lot of work boiled into a short description.  I finished this In April or May probably and gave it to my friends.  I always ask them about feedback and they always have forgotten something they wanted to be added, but in general they seemed to find it useful.  So I figured I should share it with the world.

The Dictionary file can be found here: GOTDict.mobi
The README, which is basically what I have written here can be found here: README

The information that I used to create this dictionary, which was the Song of Ice and Fire wiki, is covered by the creative commons.
http://creativecommons.org/licenses/by-sa/3.0/

Wednesday, February 20, 2013

Recipes 43 & 44: Cider-Glazed Chicken Thighs and Beet and Quinoa Tabouli

All right, it has been a long time since I have posted a recipe, but I finally have some free time, so I shall attack a bit of the back log.  I choose this... well mostly because it looked good, and it was another quinoa recipe that I could try out.  When I told my friends I made a dish with beets they looked at me incredulously and asked very seriously if I had purchased the beets on my own accord.

I thought it was good though, so I suppose that is all that really matters.  Here is the final result:


I managed to slightly burn the skin of the chicken thighs, but I am going to blame the recipe as I shall explain below.

Cider-Glazed Chicken Thighs (Link)

Ingredients

  • 8 bone-in, skin-on chicken thighs, trimmed  
  • 1 Tbs. extra-virgin olive oil  
  • Kosher salt and freshly ground black pepper  
  • 3/4 cup apple cider  
  • 1 Tbs. honey  
  • 1-1/2 Tbs. cold unsalted butter, cut into 1/4-inch pieces

Directions

Position a rack 6 inches from the broiler and heat the oven to 450°F. Line a large rimmed baking sheet with foil.

In a large bowl, toss the chicken thighs with the oil, 1 tsp. salt, and 1/2 tsp. pepper. Put a rack on the baking sheet and arrange the chicken thighs skin side up on the rack. Roast until the thighs are lightly golden and an instant-read thermometer inserted in the thickest part without touching the bone registers 165°F, about 20 minutes

Meanwhile, in a small saucepan, bring the cider and honey to a boil over high heat. Reduce the heat to medium and simmer vigorously until the mixture has reduced to 1/2 cup, 8 to 10 minutes. Remove from the heat and whisk in the butter.

Turn the broiler to high, brush the chicken thighs with the cider glaze, and broil for 1 minute. Brush with more glaze and broil again until deep golden-brown, 2 to 3 minutes. Remove the chicken from the oven, brush with more of the glaze, and serve.


Beet and Quinoa Tabouli (Link)

Ingredients

  • 2 Tbs. pine nuts  
  • 1 cup (7 oz) uncooked white quinoa  
  • 2 cups water or homemade vegetable broth  
  • Sea salt  
  • 1 large cooked beet, peeled and diced  
  • 1 cup mixed cherry tomatoes, cut in half  
  • 1/4 red onion, finely chopped  
  • 3 oz. feta cheese, crumbled

Directions

Toast the pine nuts in a frying pan over medium heat for 2 minutes, or until lightly colored and fragrant; remove from the heat and set aside to cool.

Rinse the quinoa under cold water and drain it in a colander. Add it to a pot and cover with the water or broth and a pinch of sea salt. Bring to a boil, then turn down the heat, cover, and simmer for 12 to 14 minutes, or until all of the water or broth is absorbed. Remove from the heat and keep covered for 5 more minutes. Transfer the quinoa to a bowl and fluff it with a fork; let cool. Add the beet and toss gently. The quinoa will take on a nice pink color. Add the tomatoes, onion, and cheese.

The Process

So cooking the chicken thighs was going to be pretty quick, so I first started on the tabouli.  I first  toasted the pine nuts so they would be ready.

Then I prepared the beet..... this took... much longer than I was expected.  I think next time, I would recommend cutting it in half or in smaller pieces, because cooking a whole large one was very long.
Sprinks came to explore!  My water bottle.

So the quinoa was done, I didn't include pictures of that, but I used chicken broth.  I would always recommend using broth of some sort when cooking quinoa.  Also, if you didn't buy the prewashed kind.  Make sure you wash it.

So I cut up the beet into kind of small pieces and then mixed everything together.

Then I added the onion and the feta and the cherry tomatoes.
 Mixed it all up and.... it was done!

 I think I started the chicken as the quinoa was cooking.  I tossed the chicken thighs with oil, salt and pepper and then put them in the baking sheet and put it in the oven to cook.

Then I prepared the glaze.  It was pretty simple and was done quickly.

Here is the chicken after getting out of the oven ready to be glazed and broiled
SO..... the recipe said to broil it for 2-3 minutes 6 inches away from the broiler and then glaze again and then broil again.  Perhaps I was too close to the broiler... I am not positive... but regardless.... I made a mistake and the skin got just a tad crispy and that was only after about a minute... so... be careful.

And here is the final dish.

Other than the fact that the skin was a little burnt, I thought that this meal was great.  The beet was actually really good when mixed with quinoa.  It was much better when it was warm.  The chicken was good.  The skin... was a little crispy, but the glaze helped a lot.  All in all it was a good meal, and not too bad in terms of time. 

Sunday, January 20, 2013

Recipes 41 & 42: Plum glazed Duck Breast and A Quinoa Salad

Over the thanksgiving break I had a duck breast at a restaurant in Eugene.  I thought it was really good, though perhaps a little rawer than I would have made.  However, that made me really want to try out making duck.  I was debating between two recipes, one with peaches and one with plum.  Since peaches aren't really in season I decided to go with the plum glazed recipe.

In addition, I also decided to make a quinoa salad to go with it.  I must admit that when I first tried quinoa I was a little skeptical, but I have really enjoyed a lot of the recipes that I have made with it.  I think that one big difference is making it with broth instead of water.  I think that adds a lot to the flavor.

Just a note, you might have noticed that this is recipe 42, and it happened in late November.  Which basically means that to reach my goal of 52 in a year I would have to make 10 recipes in the month of December.  It was a daunting challenge, and I wasn't sure if I was going to be able to make it, despite being behind on blogging, I swear that I did!

Here is the final result, primarily of the duck, but you can see the salad in the background.


Here is the recipe that I used for the duck: (Link)

Ingredients

  • 2 boneless, skin-on duck breast halves (about 1 lb. each)  
  • Kosher salt and freshly ground black pepper  
  • 1/2 cup plum preserves    
  • 1 Tbs. reduced-sodium soy sauce   
  • 1/4 tsp. Chinese five-spice powder  
  • Pinch crushed red pepper flakes    
  • 3 scallions, thinly sliced 

Directions

Position a rack in the center of the oven and heat the oven to 425°F. Trim any excess skin and fat from the duck and score the remaining skin and fat underneath in a 1-inch diamond pattern, taking care not to cut the flesh. Pat the duck dry and season generously with salt and pepper.
Heat a 12-inch heavy-duty skillet over medium-high heat. Put the duck in the skillet skin side down, reduce the heat to medium low, and render the fat until only a thin, crisp layer of skin remains, about 8 minutes.

Meanwhile, in a small bowl, combine the preserves, soy sauce, five-spice powder, and red pepper flakes.

Turn the duck over, carefully spoon off most of the fat from the skillet, and brush the preserves mixture over the breasts.

Transfer the skillet to the oven and roast until an instant-read thermometer inserted into the thickest part of a breast registers 135°F for medium rare, 8 to 10 minutes. Transfer the duck to a cutting board and let rest for 5 minutes. Meanwhile, tilt the skillet and spoon off as much fat from the pan juice as possible. Slice the duck diagonally into 1/4-inch slices. Arrange on plates and spoon the pan juice over. Sprinkle with the scallions and serve.

Changes

 The only change that I made was in the duck breasts that I used.  This recipe called for 2 large breasts, but the only store where I could find duck only had a frozen package of two 1/2 pound duck breasts.  This meant that they were smaller than the recipe called for.  This changed the cooking time for the recipe as I cooked it a little bit less than the recipe called for.


And here is the recipe that I used for the Quinoa Salad: (Link)

Ingredients

  • 1-1/2 cups quinoa, preferably red  
  • Sea salt  
  • 5 Tbs. extra-virgin olive oil; more as needed  
  • 1 large red onion, quartered lengthwise and thinly sliced crosswise  
  • 2 Tbs. balsamic vinegar  
  • 4 oz. arugula, trimmed and thinly sliced (about 3 cups)  
  • 4 oz. aged Gouda, finely diced (about 1 cup)  
  • 3 medium celery stalks, thinly sliced  
  • 1 large, crisp apple, such as Fuji or Pink Lady, cut into 1/2-inch dice  
  • 1 cup walnuts, coarsely chopped  
  • 1 cup finely diced fennel  
  • 3/4 cup dried cranberries  
  • 3 Tbs. sherry vinegar  
  • Freshly ground black pepper

Directions

In a bowl, rinse the quinoa with water, rubbing it between your fingers for about 10 seconds. Drain and transfer it to a 3-quart pot. Add 2-1/2 cups water and 1/2 tsp. sea salt and bring to a boil over medium-high heat. Reduce the heat to medium low and simmer, covered, until the quinoa is tender but still delicately crunchy, about 15 minutes.

Drain the quinoa and return it to the pot. Cover and let the quinoa rest for 5 minutes; then fluff it with a fork. Let cool to room temperature.

While the quinoa cooks, heat 2 Tbs. of the olive oil in a 12-inch nonstick skillet over medium-high heat. Add the onion and a pinch of salt; cook, stirring frequently, until tender and brown around the edges, 6 to 8 minutes. Add the balsamic vinegar and toss with the onions until the vinegar cooks away, about 1 minute. Remove from the heat and let cool to room temperature.

In a large bowl, mix the quinoa, onions, arugula, cheese, celery, apple, walnuts, fennel, and cranberries.

In a small bowl, whisk the remaining 3 Tbs. olive oil with the sherry vinegar, 1/2 tsp. sea salt, and a few grinds of pepper. Add the dressing to the salad and gently mix it in. Let rest a moment; then season to taste with salt and pepper. Add more olive oil if the salad seems dry.

Changes

I made two minor changes to this.  The first is that I used chicken broth to cook the quinoa in.  Also, it should be noted that I didn't wash the quinoa since I buy the prewashed brand.  However, if you don't buy prewashed quinoa, you need to make sure to wash it, otherwise it isn't going to taste very good.

The second change was that I did not add 4 oz of arugula, that seemed like way too much.  I might have added 2.5 or 3.  But I would recommend adding as much as you want.

The Process

The first step in cooking the duck was to trim the fat and score the skin.  Here I have laid them out.  To trim it I just cut a little bit of the skin off, since there wasn't a lot of fat.  Scoring the skin was a little tough, mainly because I wasn't exactly sure what I should do.  So I basically just cut the skin in diamond patterns and tried to make it a little deep, but not deep enough to reach the skin.


Once that was done I put the breasts in the skillet, skin side down.


After a few minutes, I flipped them over, the skin was crispy, so they were pretty much done.
I spooned over the plum preserve and then put them into the oven to cook them.


Meanwhile, probably actually before most of the duck work, I worked on the salad. Here is the Gouda and onions chopped up.

Most of the steps of this is pretty simple.  I cooked up the onions and quinoa and then mixed it all together.  You can see in the picture below that this looks like a lot of arugula, and that isn't even all that the recipe called for.

Here is is mixed up a little bit more.

Again, the cook time for my duck was a little bit shorter, but I took it out based on the thermometer.  I actually cooked it a little high. I think I probably went to 150 instead of 135.

And here is the final result.


I thought that both of these recipes were terrific.  The salad was really good, especially with the guoda and cranberries.  The duck was also very good.  I wish that I could have got not frozen breasts, but that was ok, this was still a great recipe.

Saturday, January 19, 2013

Recipes 39 & 40: Blue Ribbon Chili and Creamy Broccoli Casserole

While most of the recipes I have made have been completely new, there was one point where I was really feeling like Chili.  I have a recipe that I typically used, but I figured that it would be fine to highlight that.

In addition, I figured that I would make something to go with it, so that at least I was making something new.  So I settled on a broccoli casserole.

Here is a picture of the chili:


And of the broccoli casserole:


I have made this Chili many times and it is really great.   Here is the recipe (link)

Ingredients

  • 2 pounds ground beef
  • 1/2 onion, chopped
  • 1 teaspoon ground black pepper
  • 1/2 teaspoon garlic salt
  • 2 1/2 cups tomato sauce
  • 1 (8 ounce) jar salsa
  • 4 tablespoons chili seasoning mix
  • 1 (15 ounce) can light red kidney beans
  • 1 (15 ounce) can dark red kidney beans

Directions

  1. In a large saucepan over medium heat, combine the ground beef and the onion and saute for 10 minutes, or until meat is browned and onion is tender. Drain grease, if desired.
  2. Add the ground black pepper, garlic salt, tomato sauce, salsa, chili seasoning mix and kidney beans. Mix well, reduce heat to low and simmer for at least an hour.

Changes

 The only change that I made to this recipe was that I used ground sirloin.  I didn't have two pounds, I only had 1.3, but I kept everything else the same.

And here is the recipe for the broccoli casserole. (link)

Ingredients


  • 1 (16 ounce) package frozen broccoli, thawed
  • 2 tablespoons butter
  • 1/4 teaspoon salt
  • 2 tablespoons all-purpose flour
  • 2 cups milk
  • 1 (8 ounce) package cream cheese, cubed
  • 1 cup crushed buttery round crackers

Directions

  1. Preheat oven to 350 degrees F (175 degrees C).
  2. Place broccoli in a steamer over 1 inch of boiling water, and cover. Cook until tender but still firm, about 4 to 6 minutes; drain.
  3. Melt butter in a large saucepan over medium heat. Stir in salt, flour, and milk. Cook, stirring constantly, until thick and bubbly. Stir in cream cheese until melted. Remove from heat, and stir in broccoli.
  4. Sprinkle 1/2 cup of crushed crackers over the bottom of a 1 1/2 quart casserole dish. Slowly pour the broccoli mixture into the dish, and top with remaining crushed crackers.
  5. Bake in preheated oven for 30 minutes.

Changes

The main change that I made to this was that I used fresh broccoli and steamed it before continuing with the recipe.  In addition I cut the cream cheese in half and also added some garlic salt and pepper to the sauce since a lot of reviewers talked about it being a bit bland.

Finally, I only added the crumbled crackers to the top of the dish.

The Process


I started by cooking the ground sirloin and onions in a large pot.


Sprinkles, attracted by the smell of the meat came to investigate.

After the meat was ready I added the beans and spices and other ingredients, covered it and let it cook for an hour.

Then I started on the broccoli casserole.  I steamed the broccoli and then prepared the sauce.

Once the sauce was ready, I then mixed the broccoli into it.


I then put all of that into a pie plate.

I then added the crumbled crackers (in this case Ritz) to the top of the broccoli mixture.  I then put it in the oven.

As that was cooking, the chili finished.  I took it off the burner and let it sit until the broccoli casserole was done.

Here is a picture of the casserole just out of the oven.

Here is the final result of the chili, covered with sour cream and shredded cheddar cheese.

And here is the final view of the broccoli casserole.

The chili was as good as ever, I think I liked it better with ground sirloin instead of the ground beef.  I also liked the broccoli casserole.  I am not sure that it is a really healthy way to get broccoli, but it was good.

Overall, this was a very good meal.